文章仓库:Github Project
前提 本文章所用版本:
SpringBoot 2.2.6.RELEASE
springfox 3.0.0
jdk 8
不同的版本会导致版本冲突,切换版本时建议先去官方查看是否互相兼容。
开始集成 Swagger 导入swagger maven 库 1 2 3 4 5 6 7 8 9 10 11 12 <dependency > <groupId > io.springfox</groupId > <artifactId > springfox-boot-starter</artifactId > <version > 3.0.0</version > </dependency > <dependency > <groupId > io.springfox</groupId > <artifactId > springfox-swagger-ui</artifactId > <version > 3.0.0</version > </dependency >
SpringBoot引入Swagger的maven库之前,需要先引入springboot-web的maven,否则没有效果。
1 2 3 4 5 <dependency > <groupId > org.springframework.boot</groupId > <artifactId > spring-boot-starter-web</artifactId > </dependency >
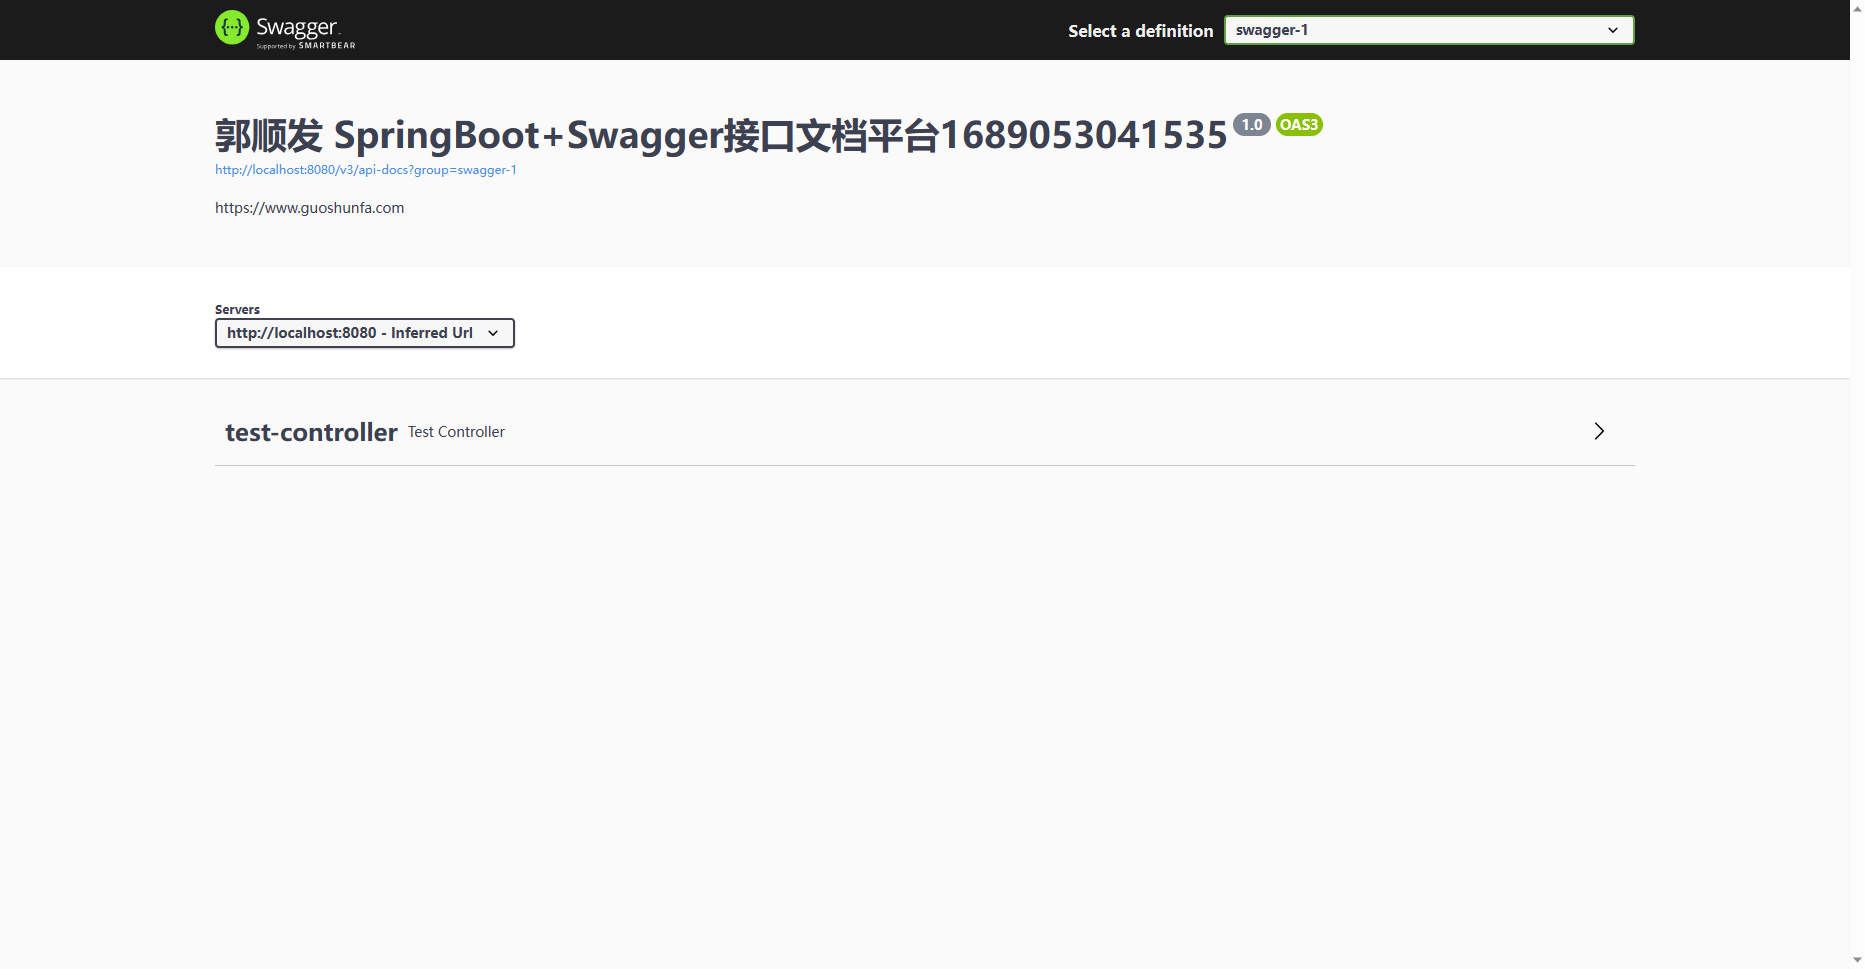
添加swagger配置类 1 2 3 4 5 6 7 8 9 10 11 12 13 14 15 16 17 18 19 20 21 22 23 24 25 26 27 28 29 30 31 32 33 34 35 36 37 38 39 40 41 42 43 44 45 46 47 48 49 50 51 import io.swagger.annotations.ApiOperation;import org.springframework.context.annotation.Bean;import org.springframework.context.annotation.Configuration;import springfox.documentation.builders.ApiInfoBuilder;import springfox.documentation.builders.PathSelectors;import springfox.documentation.builders.RequestHandlerSelectors;import springfox.documentation.oas.annotations.EnableOpenApi;import springfox.documentation.service.ApiInfo;import springfox.documentation.spi.DocumentationType;import springfox.documentation.spring.web.plugins.Docket;import springfox.documentation.swagger2.annotations.EnableSwagger2;@Configuration @EnableOpenApi @EnableSwagger2 public class SwaggerConfig { @Bean("swagger-1") public Docket createRestApi () { return new Docket (DocumentationType.OAS_30) .groupName("swagger-1" ) .apiInfo(apiInfo()) .select() .apis( RequestHandlerSelectors.withMethodAnnotation(ApiOperation.class)) .paths(PathSelectors.any()) .build(); } @Bean("swagger-2") public Docket createRest2Api () { return new Docket (DocumentationType.OAS_30) .groupName("swagger-2" ) .apiInfo(apiInfo()) .select() .apis( RequestHandlerSelectors.withMethodAnnotation(ApiOperation.class)) .paths(PathSelectors.any()) .build(); } private ApiInfo apiInfo () { return new ApiInfoBuilder () .title("郭顺发 SpringBoot+Swagger接口文档平台" + System.currentTimeMillis()) .description("https://www.guoshunfa.com" ) .version("1.0" ) .build(); } }
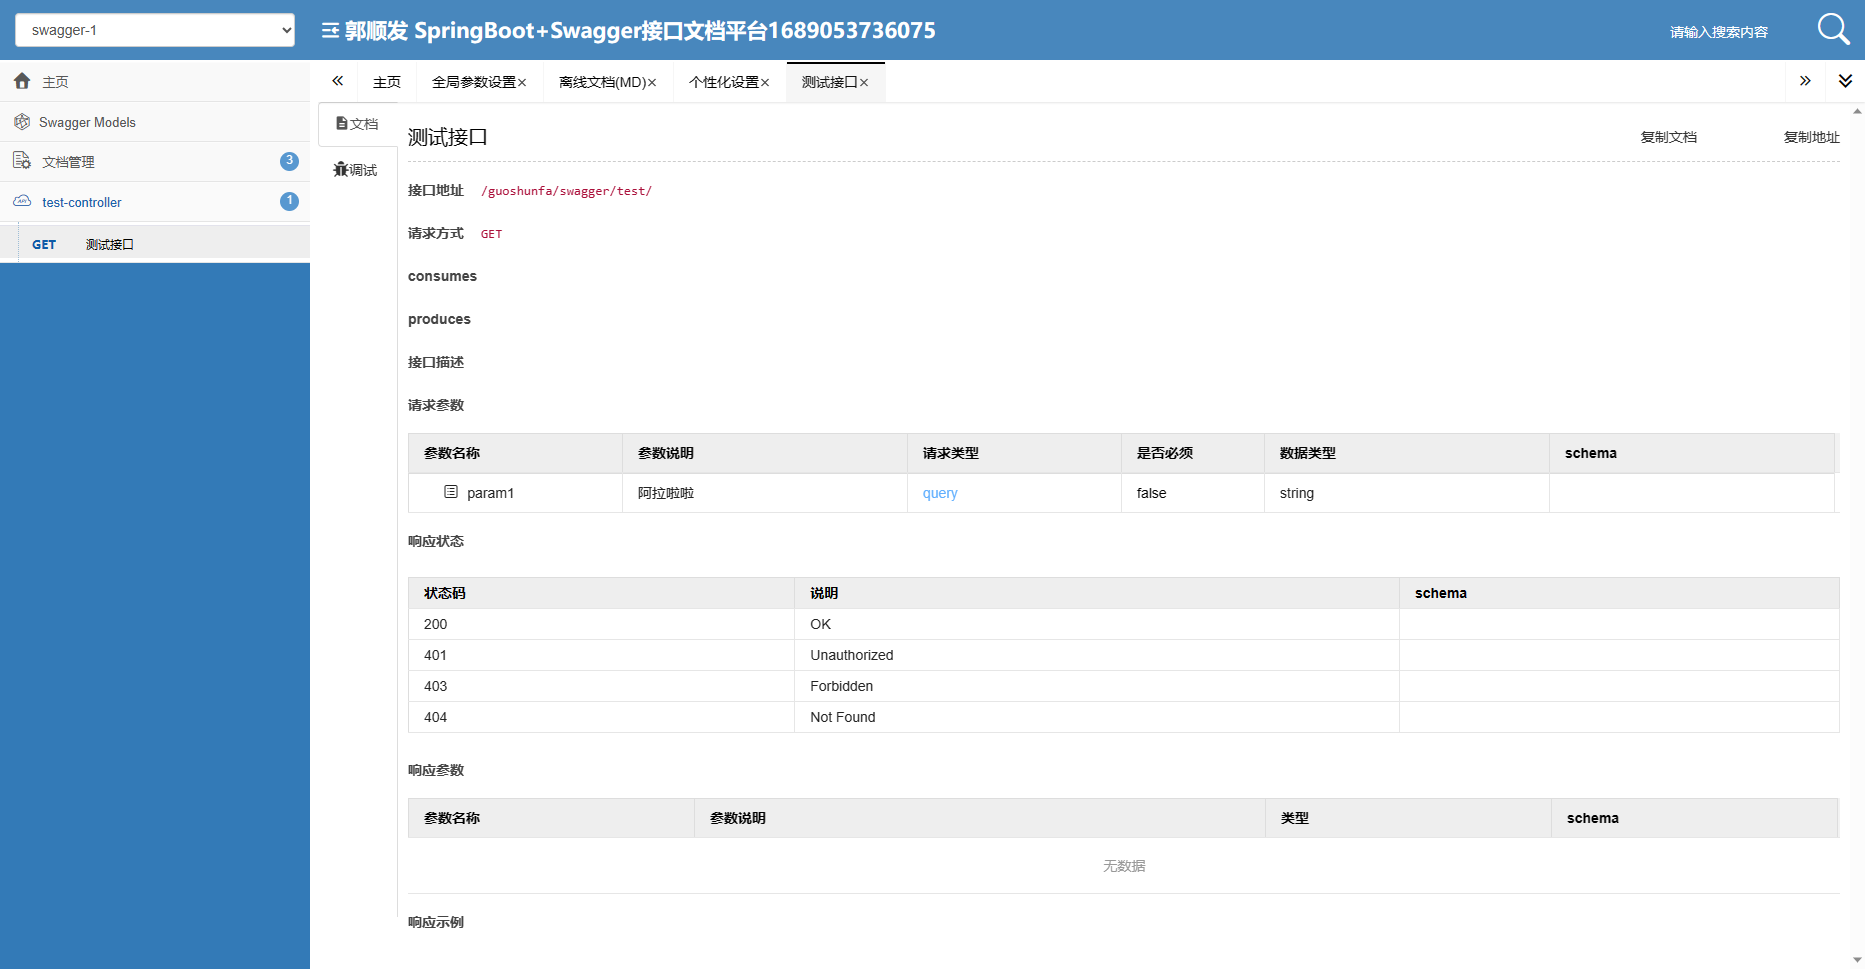
编写API接口 1 2 3 4 5 6 7 8 9 10 11 12 13 14 15 16 17 import io.swagger.annotations.Api;import io.swagger.annotations.ApiOperation;import io.swagger.annotations.ApiParam;import org.springframework.web.bind.annotation.GetMapping;import org.springframework.web.bind.annotation.RequestMapping;import org.springframework.web.bind.annotation.RestController;@RestController @Api("测试controller") @RequestMapping("/guoshunfa") public class TestController { @ApiOperation("测试接口") @GetMapping("/swagger/test/") public void test (@ApiParam("阿拉啦啦") String param1) {} }
查看swagger-ui效果 启动项目,将
浏览器访问 http://ip:port/swagger-ui/index.html
其他页面展示效果 - swagger-bootstrap-ui 效果 使用其他ui需要引入maven
1 2 3 4 5 <dependency > <groupId > com.github.xiaoymin</groupId > <artifactId > swagger-bootstrap-ui</artifactId > <version > 1.9.6</version > </dependency >
效果
浏览器访问 http://ip:port/doc.html
Swagger API
最新版本还添加了许多注释,用于在 Swagger 定义级别添加扩展和元数据:
资源 API 声明 在 Swagger 2.0 中,资源被标签替换,这会影响@Api注释。它不再用于声明资源,而现在用于为在它下定义的所有操作应用定义。
JAX-RS 的用法是:
1 2 3 4 5 6 7 8 @Path("/pet") @Api(value = "pet", authorizations = { @Authorization(value="sampleoauth", scopes = {}) }) @Produces({"application/json", "application/xml"}) public class PetResource { ... }
在这个例子中,我们说这个类下的操作的标签是pet(所以它们都会被组合在一起)。Swagger 将获取@Produces注释,但如果您愿意,您可以覆盖此值。
@Api也可用于在资源级别声明授权。这些定义适用于该资源下的所有操作,但如果需要,可以在操作级别覆盖。在上面的示例中,我们添加了一个先前声明的 OAuth2 授权方案,没有任何范围。有关更多详细信息,请检查@Authorization 注释。
除了使用value(),您可以使用tags()允许您为操作设置多个标签的属性。例如:
1 @Api(tags = {"external_info","user_info"})
请注意,在这种情况下,value()即使它存在也会被忽略。
布尔hidden属性可用于完全隐藏 @Api,即使它已声明。这在使用子资源删除不需要的工件时特别有用。
在 swagger-core 1.5.X 中,description()不再使用basePath()、 和。position()
有关此注释、用法和边缘情况的更多详细信息,请查看javadocs 。
运营声明 @ApiOperation用于声明单个操作。操作被认为是路径和 HTTP 方法的唯一组合。
JAX-RS 的用法是:
1 2 3 4 5 6 7 @GET @Path("/findByStatus") @ApiOperation(value = "Finds Pets by status", notes = "Multiple status values can be provided with comma seperated strings", response = Pet.class, responseContainer = "List") public Response findPetsByStatus(...) { ... }
注释的value是对 API 的简短描述。由于它显示在 Swagger-UI 的操作列表中,并且位置大小有限,因此应保持简短(最好小于 120 个字符)。这notes允许您提供有关操作的更多详细信息。response是方法的返回类型。请注意,实际的方法声明返回的Response是一个通用 JAX-RS 类,而不是发送给用户的实际响应。如果返回的对象是实际结果,可以直接使用,不用在注解中声明。由于我们想要返回一个宠物列表,我们使用responseContainer. 请记住,Java 具有类型擦除,因此在返回类型中使用泛型可能无法正确解析,并且response应该直接使用。JAX-RS 注释将@GET用作操作的 (HTTP)method字段,它@Path会告诉我们操作的路径(操作分组在同一路径下,每个使用的 HTTP 方法一个)。
输出将是:
1 2 3 4 5 6 7 8 9 10 11 12 13 14 15 16 17 18 19 20 "/pet/findByStatus": { "get": { "tags": [ "pet" ], "summary": "Finds Pets by status", "description": "Multiple status values can be provided with comma seperated strings", "responses": { "200": { "description": "successful operation", "schema": { "type": "array", "items": { "$ref": "#/definitions/Pet" } } }, . . .
有关此注释、用法和边缘情况的更多详细信息,请查看javadocs 。
使用 HTTP 状态代码返回错误(或其他成功消息)是一种常见的做法。虽然在@ApiOperation 中定义了操作的一般返回类型,但应使用这些注释来描述其余的返回代码。
描述了一个具体的@ApiResponse可能响应。不能直接在方法或类/接口上使用,需要包含在数组值中@ApiResponses(无论是一个响应还是多个响应)。
如果响应伴随着身体,也可以描述身体模型(每个响应一个模型)。
1 2 3 4 5 @ApiResponses(value = { @ApiResponse(code = 400, message = "Invalid ID supplied", responseHeaders = @ResponseHeader(name = "X-Rack-Cache", description = "Explains whether or not a cache was used", response = Boolean.class)), @ApiResponse(code = 404, message = "Pet not found") }) public Response getPetById(...) {...}
在 swagger-core 1.5.X 中,您还可以添加响应标头的描述,如上例所示。
有关此注释、用法和边缘情况的更多详细信息,请查看 javadocs(@ApiResponses 、@ApiResponse ) 。
这些注释仅用作@Api 和@ApiOperation 的输入,而不是直接用于资源和操作。一旦您声明并配置了您在 API 中支持的授权方案,您就可以使用这些注释来记录资源或特定操作需要哪种授权方案。这@AuthorizationScope是特定于 OAuth2 授权方案的情况,您可能希望指定特定的支持范围。
@Authorization 和 @AuthorizationScope 转换为Security Requirement Object 。
实现(JAX-RS、Servlet 或其他)之间的行为是相同的:
1 2 3 4 5 6 7 8 9 @ApiOperation(value = "Add a new pet to the store", authorizations = { @Authorization( value="petoauth", scopes = { @AuthorizationScope(scope = "add:pet") } ) } ) public Response addPet(...) {...}
在这种情况下,我们声明该addPet操作使用petoauth授权方案(我们假设它是 OAuth2 授权方案)。然后使用我们通过说它需要范围@AuthorizationScope来微调定义。add:pet如上所述,您可以看到@AuthorizationScope用作 的输入@Authorization,而后者又用作 的输入@ApiOperation。请记住,这些注释只能用作 和 的@Api输入@ApiOperation。直接在类或方法上使用它们中的任何一个都将被忽略。
输出将是:
1 2 3 4 5 6 7 "security": [ { "petoauth": [ "add:pet" ] } ]
有关此注解、用法和边缘情况的更多详细信息,请查看 javadocs(@Authorization 、@AuthorizationScope ) 。
@ApiParam仅与 JAX-RS 参数注释(@PathParam、@QueryParam、@HeaderParam和@FormParamJAX-RS 2 中的)一起使用@BeanParam。虽然 swagger-core 默认扫描这些注释,但@ApiParam可用于在参数中添加更多详细信息或更改从代码中读取的值。
在 Swagger 规范中,这转换为Parameter Object 。
Swagger 将选取value()这些注解并将它们用作参数名称,并且基于注解它还将设置参数类型。
如果存在,Swagger 还将使用 的值@DefaultValue作为默认值属性。
1 2 3 4 5 6 @Path("/{username}") @ApiOperation(value = "Updated user", notes = "This can only be done by the logged in user.") public Response updateUser( @ApiParam(value = "name that need to be updated", required = true) @PathParam("username") String username, @ApiParam(value = "Updated user object", required = true) User user) {...}
这里我们有两个参数。第一个,username它是路径的一部分。第二个是主体,在本例中是一个用户对象。请注意,这两个参数的required属性都设置为true。对于@PathParam,这是多余的,因为默认情况下它是强制性的并且不能被覆盖。
输出将是:
1 2 3 4 5 6 7 8 9 10 11 12 13 14 15 16 17 18 "parameters": [ { "name": "username", "in": "path", "description": "name that need to be deleted", "required": true, "type": "string" }, { "in": "body", "name": "body", "description": "Updated user object", "required": true, "schema": { "$ref": "#/definitions/User" } } ]
有关此注释、用法和边缘情况的更多详细信息,请查看javadocs 。
您可能希望手动描述操作参数。这可能有多种原因,例如:
使用不使用 JAX-RS 注释的 Servlet。
想要隐藏定义的参数并用完全不同的定义覆盖它。
描述在到达 JAX-RS 实现之前由过滤器或其他资源使用的参数。
由于可以包含多个参数,因此@ApiImplicitParams允许多个@ApiImplicitParam定义。
在 Swagger 规范中,这些转换为Parameter Object 。
隐式定义参数时,设置name和dataTypeSwaggerparamType的定义正确很重要。
1 2 3 4 5 6 @ApiImplicitParams({ @ApiImplicitParam(name = "name", value = "User's name", required = true, dataType = "string", paramType = "query"), @ApiImplicitParam(name = "email", value = "User's email", required = false, dataType = "string", paramType = "query"), @ApiImplicitParam(name = "id", value = "User ID", required = true, dataType = "long", paramType = "query") }) public void doPost(HttpServletRequest request, HttpServletResponse response) throws ServletException, IOException {...}
在上面的示例中,我们可以看到一个带有多个参数的 Servlet 定义。dataType可以是原始名称或类名称。可以是 Swagger 支持的paramType任何参数类型(有关详细信息,请参阅 javadocs 或规范)。
1 2 3 4 5 6 7 8 9 10 11 12 13 14 15 16 17 18 19 20 21 22 23 24 "parameters": [ { "name": "name", "description": "User's name", "required": true, "type": "string", "in": "query" }, { "name": "email", "description": "User's email", "required": false, "type": "string", "in": "query" }, { "name": "id", "description": "User ID", "required": true, "type": "integer", "format": "int64", "in": "query" } ]
有关此注释、用法和边缘情况的更多详细信息,请查看 javadocs(@ApiImplicitParam 、@ApiImplicitParams ) 。
如果要描述响应标头,只需将其添加到@ApiOperation 或@ApiResponse ,同时提供标头的名称、描述和类型。
例如,在给定的响应中,它将如下所示:
1 2 3 4 5 @ApiResponses(value = { @ApiResponse(code = 400, message = "Invalid ID supplied", responseHeaders = @ResponseHeader(name = "X-Rack-Cache", description = "Explains whether or not a cache was used", response = Boolean.class)), @ApiResponse(code = 404, message = "Pet not found") }) public Response getPetById(...) {...}
有关此注释、用法和边缘情况的更多详细信息,请查看javadocs 。
模型声明 Swagger-core 基于在整个 API 内省中对模型定义的引用来构建模型定义。允许您操作模型的@ApiModel元数据,从简单的描述或名称更改到多态性的定义。
这转化为 Swagger 规范中的模式对象 。
在其基本功能中,您@ApiModel可以更改模型的名称并为其添加描述:
1 2 @ApiModel(value="DifferentModel", description="Sample model for the documentation") class OriginalModel {...}
在这里,我们将模型的名称从 OriginalModel 更改为 DifferentModel。
输出将是:
1 2 3 4 5 "DifferentModel": { "description": "Sample model for the documentation", . . }
您还可以@ApiModel通过指定子类型来实现模型组合,例如:
1 2 3 4 @ApiModel(value = "Pet", subTypes = {Cat.class}) public class Pet { }
swagger-samples 中提供了此场景的示例:
https://github.com/swagger-api/swagger-samples/blob/master/java/java-jaxrs/src/main/java/io/swagger/sample/model/Pet.java
https://github.com/swagger-api/swagger-samples/blob/master/java/java-jaxrs/src/main/java/io/swagger/sample/model/Vehicle.java
有关此注释、用法和边缘情况的更多详细信息,请查看javadocs 。
虽然 swagger-core 将自省字段和 setter/getter,但它还将读取和处理 JAXB 注释。允许控制 Swagger 特定的@ApiModelProperty定义,例如允许的值和附加注释。如果您想在某些情况下隐藏该属性,它还提供了额外的过滤属性。
1 2 3 4 @ApiModelProperty(value = "pet status in the store", allowableValues = "available,pending,sold") public String getStatus() { return status; }
这是向模型属性添加简短描述的简单示例。还可以观察到,虽然status是一个字符串,但我们将它记录为只有三个可能的值。
它的输出将是:
1 2 3 4 5 6 7 8 9 10 11 12 "properties": { ..., "status": { "type": "string", "description": "pet status in the store", "enum": [ "available", "pending", "sold" ] } }
有关此注释、用法和边缘情况的更多详细信息,请查看javadocs 。
定义 SwaggerDefinition 注释提供了与Swagger 对象的许多(但不是全部)顶级属性相对应的属性,允许您为自动生成的定义设置这些属性。注释可以在 Swagger 自动配置过程中扫描的任何类上,即它不必在 JAX-RS API 类上,而可以只是在标记/配置接口上,例如:
1 2 3 4 5 6 7 8 9 10 11 12 13 14 15 16 17 18 19 20 21 22 23 24 25 26 @SwaggerDefinition( info = @Info( description = "Gets the weather", version = "V12.0.12", title = "The Weather API", termsOfService = "http://theweatherapi.io/terms.html", contact = @Contact( name = "Rain Moore", email = "rain.moore@theweatherapi.io", url = "http://theweatherapi.io" ), license = @License( name = "Apache 2.0", url = "http://www.apache.org/licenses/LICENSE-2.0" ) ), consumes = {"application/json", "application/xml"}, produces = {"application/json", "application/xml"}, schemes = {SwaggerDefinition.Scheme.HTTP, SwaggerDefinition.Scheme.HTTPS}, tags = { @Tag(name = "Private", description = "Tag used to denote operations as private") }, externalDocs = @ExternalDocs(value = "Meteorology", url = "http://theweatherapi.io/meteorology.html") ) public interface TheWeatherApiConfig { }
上面显示的属性会导致相应的元数据被添加到生成的 swagger.json / swagger.yaml 文件中
如果您有多个 @SwaggerDefinition 注释,它们将按照它们被发现的顺序进行聚合 - 任何重复的注释属性都将覆盖以前的属性。
@Info 注释为 Swagger 定义添加通用元数据属性 - 对应于规范中的Info 对象。如上例所示:
1 2 3 4 5 6 7 8 9 @SwaggerDefinition( info = @Info( description = "Gets the weather", version = "V12.0.12", title = "The Weather API", termsOfService = "http://theweatherapi.io/terms.html", ... ), ...
有关受支持属性的完整列表,请参阅javadoc 。
@Contact 注释将联系人属性添加到 Swagger 定义的 @Info 部分 - 对应于规范中的联系人 对象。如上例所示:
1 2 3 4 5 6 7 8 9 10 11 @SwaggerDefinition( info = @Info( ... contact = @Contact( name = "Rain Moore", email = "rain.moore@theweatherapi.io", url = "http://theweatherapi.io" ), ... ), ...
有关受支持属性的列表,请参阅javadoc 。
@License 注释将许可证属性添加到 Swagger 定义的 @Info 部分 - 对应于规范中的许可证 对象。如上例所示:
1 2 3 4 5 6 7 8 9 @SwaggerDefinition( info = @Info( ... license = @License( name = "Apache 2.0", url = "http://www.apache.org/licenses/LICENSE-2.0" ) ), ...
有关受支持属性的列表,请参阅javadoc 。
扩展注释允许将扩展属性 添加到 Swagger 定义中。它目前在 @ApiOperation、@Info 和 @Tag 注释中受支持。有两种使用方法:
1 2 3 4 5 6 7 8 ... extensions = { @Extension(properties = { @ExtensionProperty(name = "test1", value = "value1"), @ExtensionProperty(name = "test2", value = "value2") }) } ...
这将导致以下json:
1 2 3 4 ... "x-test1" : "value1", "x-test2" : "value2" ...
如果在注释中没有明确地这样做,属性名称将自动以“x-”为前缀。
或者,您可以将扩展名命名为:
1 2 3 4 5 6 7 8 ... extensions = { @Extension( name = "my-extension", properties = { @ExtensionProperty(name = "test1", value = "value1"), @ExtensionProperty(name = "test2", value = "value2") }) } ...
这将导致以下json:
1 2 3 4 5 6 ... "x-my-extension" : { "test1" : "value1", "test2" : "value2" } ...
它将包含的扩展属性包装在 JSON 对象中。
扩展中的单个属性 - 有关示例,请参见前面的@Extension 部分。
自定义 Swagger 定义 如果您出于任何原因想要自定义生成的 Swagger 定义超出注释的范围,您可以为 Swagger 引擎提供提供相应回调的 ReaderListener:
1 2 3 4 5 6 7 8 9 10 11 12 13 14 15 16 17 18 19 20 21 22 public interface ReaderListener { /** * Called before the Swagger definition gets populated from scanned classes. Use this method to * pre-process the Swagger definition before it gets populated. * * @param reader the reader used to read annotations and build the Swagger definition * @param swagger the initial swagger definition */ void beforeScan(Reader reader, Swagger swagger); /** * Called after a Swagger definition has been populated from scanned classes. Use this method to * post-process Swagger definitions. * * @param reader the reader used to read annotations and build the Swagger definition * @param swagger the configured Swagger definition */ void afterScan(Reader reader, Swagger swagger); }
在使用此注解进行资源扫描期间找到的任何类都将被实例化并相应地调用。例如下面的类:
1 2 3 4 5 6 7 public class BasePathModifier implements ReaderListener { void beforeScan(Reader reader, Swagger swagger){} void afterScan(Reader reader, Swagger swagger){ swagger.setBasePath( System.getProperty( "swagger.basepath", swagger.getBasePath() )); } }
将允许您从系统属性覆盖生成的 basePath。
参考文档